How to Speed Up Your Windows 10 PC Performance
Windows 10 Performance
Windows 10 is perhaps the most efficient operating system that Microsoft has produced. It is designed to startup fast, has more built-in security, and is compatible with all the software and hardware that you need for everyday work. In spite of its useful features and overall high performance, with time and usage, your PC is likely to slow down. Unnecessary software, temporary and redundant files, Windows visual effects, and system settings are a few of the common things that contribute to slowing your Windows 10 PC.
Fortunately, Windows gives you a lot of control over your system settings and appearance allowing you to make tweaks that help improve the performance of your PC. The Windows 10 performance improvement tips that we are sharing in this blog post are easy to implement and in just a few minutes you will be able to speed up your Windows 10 PC and, performance-wise, it will be as good as new.
12 Simple Steps To Improve Performance And Speed Up Windows 10
Here are 12 steps, which will help improve your Windows 10 PC performance, you can do yourself easily and for free:
1. Disable Unnecessary Programs That Run On Startup
If your Windows PC takes a long time to start up and is sluggish when it does start, most of the time, the reason is that you’ve too many programs running in the background. It is very likely that you don’t need most of these programs to run all the time. All you need to do is to stop these unwanted programs from running and your PC will run faster.
To disable the unnecessary programs from running on startup, you first need to launch the task manager. There are a few ways of launching the startup manager but we don’t want you to remember any key combinations or extra steps, so the easiest way is to type “Task Manager” in the search box at the bottom left of your screen, i.e. your taskbar.
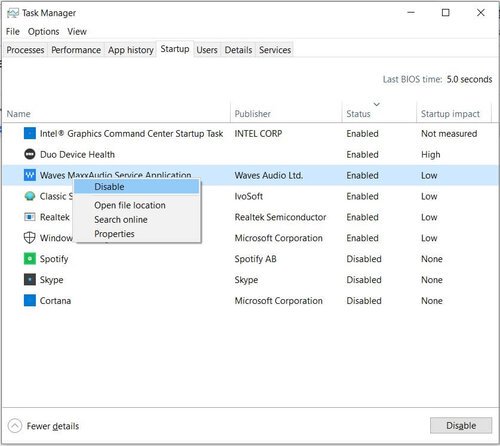
Click the Task Manager application or if it’s highlighted you can simply hit enter. This will launch the task manager. In the task manager window, select the “Startup tab”. This will display a list of programs that run when you start your PC. The list has additional information such as the names of the apps’ publishers, whether they are enabled to run on startup, and their “Startup impact”, i.e. how much it slows down your system at startup.
To prevent a program from launching at startup, simply right-click it and select “Disable.” This won't uninstall or disable the program completely but it only prevents the program from launching at startup. You can launch the program after the system startup. This way Windows will start up faster since it won’t have to load up a bunch of unnecessary programs when it’s starting. If your preferences change and you want the program to launch at startup, you can always go back and enable it by right-clicking and selecting the “Enable” option.
Be careful not to disable any application that you don’t know. If you are not sure what an application does, it’s better to go online and search what the app does before disabling it.
2. Disable OneDrive Sync
OneDrive is Microsoft’s cloud-based storage that’s built into Windows 10. It keeps your files synced and up-to-date on the cloud, which makes it a useful backup tool. The syncing between your PC and the cloud happens constantly due to which your PC may slow down.
If you don’t use OnDrive, you can prevent OneDrive from running in the background and slowing your PC. To do this, right-click the OneDrive icon, which looks like a cloud, on the right side of the taskbar. This will launch a popup. Click “Settings” in the menu at the bottom right of the pop-up.
In the window that opens, click the “Account” tab and click “Unlink this PC”. Windows 10 may not like this and will show you a window that asks you to connect your OneDrive account. To close this window, right-click the OneDrive icon again and select the “Close OneDrive” menu item.
If you do use OneDrive, then instead of unlinking your account, you may want to pause the syncing. To do this, launch the OneDrive popup screen and click “Pause syncing”, then select either 2 hours, 8 hours, or 24 hours to pause the syncing for that period.
3. Turn Off Windows Tips, Tricks, And Suggestions
Windows 10, by default, shares tips, tricks, and suggestions to help you use the PC better. This requires Windows 10 to keep an eye on how you use your PC. This is not just undesirable from a privacy point of view but it can also slow down your PC. To stop receiving these suggestions from Windows, type “Notification & Action Settings” in the search box and hit enter to launch the Notifications & Actions window. Scroll down the window and uncheck the box next to “Get tips, tricks, and suggestions as you use Windows”
This will help speed up your PC a little bit.
4. Turn Off Windows Search Indexing
Windows 10, in theory, helps you search for items on your PC faster. It does this by indexing your hard disk in the background while you are using your PC. Because of this background usage, your PC’s performance can become slow, and turning indexing off will boost the speed of your system.
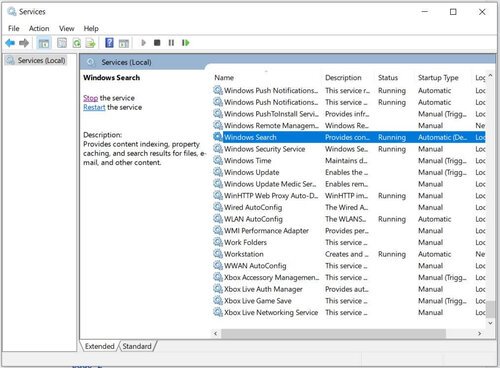
To turn indexing off, type “services.msc” in our friend, the search box, and hit enter. Scroll down the list and click on “Windows Search”. This will populate the space on the left side of the window under “Services (Local)”. Click on “Stop” to stop Windows Search Indexing.
If you can’t find the “Windows Search” service listed, look for “Indexing Service”. You can also double click on the service to open a pop-up window and click “Stop” under the “Services” section in the “General” tab.
5. Use ReadyBoost To Improve Your PC’s Performance
Windows ReadyBoost feature helps your PC performance by speeding up your data cache. It’s like adding a little extra RAM to your computer without opening it up. However, it works only for traditional hard disks, i.e. Hard Disk Drives (HDD), and not for Solid-State Drives (SSD). To use ReadyBoost, you need a USB flash drive or memory card with at least 500 MB free space and a high data transfer rate.
Here’re the steps to use ReadyBoost:
Plug in your flash drive into a USB port on your PC.
Launch the File Explorer from the taskbar and click “This PC” on the left-hand menu.
Right-click the USB flash drive, then select Properties.
Select the “ReadyBoost” tab, then click “Use this device”.
Windows will automatically determine if your PC can use ReadyBoost and let you know.
After that, it will determine and recommend how much free space to use to optimize memory.
Select OK to reserve the recommended space for ReadyBoost.
In the USB flash drive, you will find a file named ReadyBoost.sfcache, which shows how much space is reserved for ReadyBoost. That’s it, you are now all set to use ReadyBoost. It will take a few days for your cache to build and for ReadyBoost to offer improved performance. If you don’t notice an increase in performance, try using a flash drive with a larger capacity.
6. Tweak Windows Visual Effects
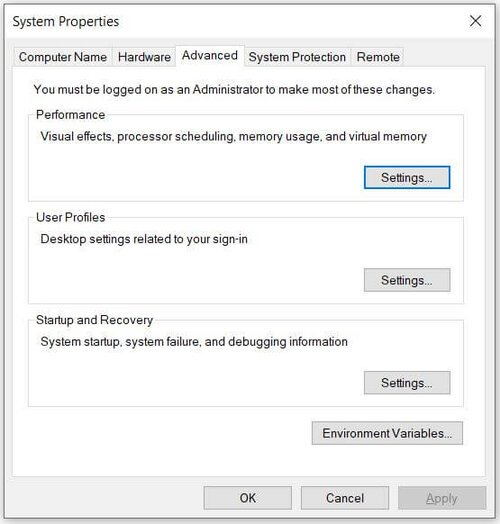
Windows 10 has nice visual effects such as shadows and animations, which makes it visually pleasing but performance-wise drains a lot of computing resources. The good news is that it is easy to tweak the effects or even turn them off completely. To do this, head back to the Windows 10 search box on your taskbar and type “sysdm.cpl” and hit enter. This will open the “System Properties” window. Select the “Advanced” tab and click “Settings”.
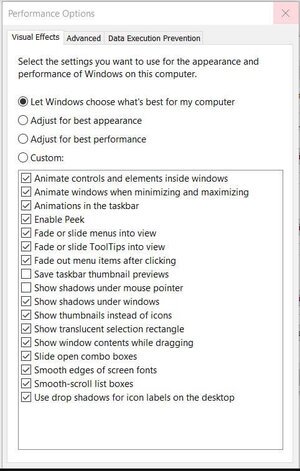
This opens the “Performance Options” window. On it, select the “Visual Effects” tab, where you will find a list of appearance options. You could play around with the Custom settings by unchecking the different controls and see how it impacts your system appearance. If you don’t have the time or patience for it, select the “Adjust for best appearance”.
This will turn off the visual effects, which slow down your system. Although this improves your PC performance, you may notice the edges of icons and text become slightly pixelated or it may remind you of Windows 98. If you don’t like the look, you can always roll back the changes.
7. Disable Windows Transparency Effects
Apart from the shadows, animations, and visual effects, Windows 10 also adds transparency effects to the Start menu, the Taskbar, and the Action Center. Turning this off makes a significant improvement in your system performance.
To disable the transparency effects, we once again head to the Windows 10 search box and type “Themes” to bring up the “Themes and related settings” and hit enter. In the Settings window that opens, click “Colors” on the left-hand side menu. Scroll down to the “Transparency Effects” option and click to toggle off the effects.
8. Run Automated System Maintenance
Windows 10 can automatically run scheduled maintenance on your PC when it’s not in use. It performs tasks such as system diagnostics, security scanning, and software updates at the time of your choosing if the PC is not in use. By default, the automatic maintenance is set to run every day at 2:00 a.m. Make sure that this hasn’t been turned off and keep your system asleep and plugged in to a power source.
To set this up, type in “Automatic Maintenance” in the Windows 10 search box and hit enter to open the Automatic Maintenance window. Click the checkbox adjacent to “Allow scheduled maintenance to wake up my computer at the scheduled time”, then click OK. That’s it, Windows will now automatically run system maintenance and ensure that your PC is in good health.
9. Scan For Virus And Malware
Another major contributor to slowing down your computer is malware. Viruses and malware take up CPU and system resources, slowing down your computer. Regular scans will help you detect and delete malware, and keep your PC running fast and smooth.
If you have a good antivirus installed and enabled auto-scan and auto-update, you will likely be safe. Even if you haven’t installed any endpoint security suite, you can use Windows Security to run periodic scans.
To launch Windows Security, click the shield icon in the taskbar or type “Windows Security” in the search box and hit enter. The window that opens up will give you an overview of the health and security of your device. Click on the “Virus & threat protection”, then on “Quick Scan” to check for threats on your PC. You can also click on “Scan options” to reveal more types of scans that you can run.
In addition to scans with your antivirus, it is also recommended to use a specialized anti-malware application to protect your system. Malwarebytes is the best option out there and comes with a free version.
10. Clean Your Hard Disk
A full hard disk or one that’s reaching its storage limit can also slow down your PC. Cleaning your hard disk to remove unnecessary files will give you a quick speed boost. Windows 10 has an inbuilt tool called Storage Sense that can automatically free up space on your hard drive by deleting unwanted files, temporary files, and content in your recycle bin.
To set this up, let’s once again go to our trusty Windows 10 search box and type “Storage settings” and hit enter to launch the Storage settings window. At the top of the window, click the toggle button from Off to On. This enables Windows to monitor your storage and delete junk or temporary files to free up space.
You can also customize how and when Storage Sense runs by clicking the “Configure Storage Sense or run it now” option.
11. Defragment Your Hard Disk
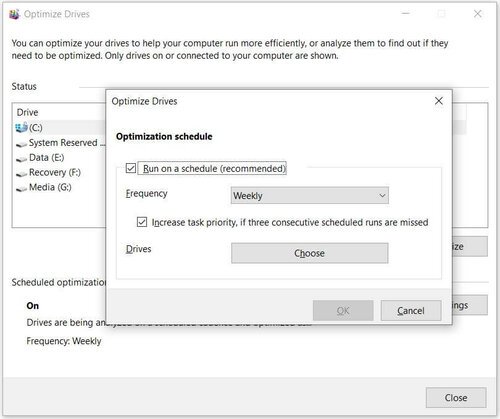
Over a period of time, with sustained usage, your hard disk tends to become slow due to file system fragmentation. Fragmentation means that your files are stored in fragments, i.e. they aren’t stored continuously. This increases the disk head movement and slows down your PC. Fortunately, Windows has an inbuilt tool that helps you with defragmentation to optimize your hard disk.
To use this tool, type “defrag” in the Windows 10 search box and hit enter. In the window that opens up, select the drive you want to defragment and click the “Optimize” button. You can also schedule the defragmentation to run automatically by clicking the “Change settings” button and choosing the desired frequency from the dropdown menu.
It is important to note that fragmentation isn’t a problem if you are using Solid-State Drive (SSD) since there is no mechanical movement. So you don’t need to defragment such drives. But for the traditional Hard Disk Drives (HDD) defragmentation is a useful tool.
12. Shutdown And Restart Your PC
Last but not least, we come to a simultaneously loved and hated secret weapon of IT technicians. It goes by various names including power cycle, hard boot, but the most common one is “shutdown and restart”. It is surprising how often this simple step works.
In this case, however, it is no surprise because shutting down your system clears out your RAM and frees up any excess usage that couldn’t otherwise be cleared. Shutting down also kills processes you started but no longer need but which run in the background hogging computing resources. This is an instant remedy and after restarting your PC, you will be pleasantly surprised how quickly and smoothly your PC runs.
The next time your Windows 10 PC suddenly becomes sluggish or you just want to do routine maintenance of your computer, try some or all of the above tips to improve the performance of your computer in a few minutes and for free.


